Homemade Pumpkin Dog Chew Sticks Your Dog Will Love 🎃
If fall had an official dog treat, it would be these tasty pumpkin chew sticks. They’re soft but sturdy, full of flavor, and packed with a few of our dogs’ favorite things: pumpkin, peanut butter, oats… need I say more?
But the best part about these chew sticks is that you don’t need to wait until autumn to make them. They’re great all year round!
These homemade chews are a little more hands-on than some of our other dog treat recipes, but the extra effort is so worth it. Especially if, like me, you enjoy a cosy Sunday afternoon baking something just as much for your dog as for yourself. Add a podcast and a cup of tea, and you’ve got the perfect autumn ritual.
The result? A batch of 24 chewy, wholesome sticks that are perfect for doggos who love to gnaw and nibble. Winston likes to stash his under the couch before eventually trotting off to enjoy it in his bed — classic Corgi behavior.
Wholesome ingredients
If your dog isn’t a fan of carrots, you could swap them for finely grated zucchini or even skip them altogether. Just make sure to squeeze as much moisture out of the veg and pumpkin as you can — it helps the sticks hold their shape and bake up with the perfect texture.
As always, check your peanut butter label for xylitol-free. And if you’re not sure about any ingredients for your particular dog, give your vet a quick call to double check. Better safe than sorry.
These sticks will keep for up to a week in the fridge — or longer in the freezer — so they’re great to batch make and pull out when your pup deserves a little something special. Which, let’s be honest, is most days.
Natural, healthy ingredients


long-lasting deliciousness


Pumpkin & Peanut Butter Dog Chew Sticks
Ingredients
Method
- Preheat oven to 300°F (150°C). Prepare a baking sheet with parchment paper.
- Place a double layer of paper towels over a fine mesh sieve and add the pumpkin puree to the center. Fold the paper towels over the top and press gently to remove as much liquid as possible. Repeat the same process with the grated carrots. Using a food processor on pulse setting, grind 1 ½ cups of oats into a coarse, grainy flour.
- In a medium bowl, combine the pumpkin, carrots, peanut butter, coconut oil and apple cider vinegar.
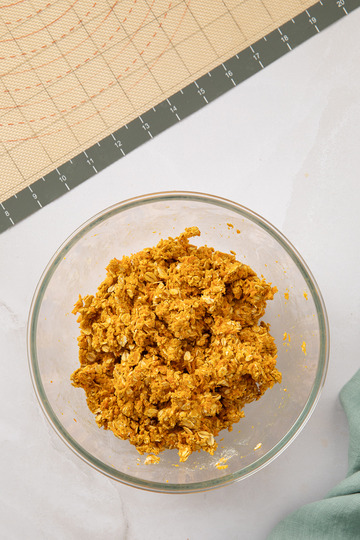
- Add half of the oat flour to the wet ingredients and mix well before adding the rest. Use the back of a metal or wooden spoon to help combine thoroughly. Add the remaining ½ cup of whole oats and mix until fully incorporated. The mixture should be dry but hold together when pressed into a ball. If it crumbles or cracks apart, add 1–2 tablespoons of water until it sticks.
- Place the dough onto a lightly floured surface and press it into a rough rectangle. Lay a sheet of parchment paper over the top and roll it out to about ½ inch (1 cm) thick. If you prefer clean, even edges, use a bench scraper and your fingers to square off the corners. Make sure the dough is firmly pressed together, with no loose or crumbling edges—similar to shaping a cookie or graham cracker crust.
- Use a bench scraper or long knife to cut the dough into 24 sticks. Arrange them on the prepared baking sheet, leaving space between each piece. Bake for 40–45 minutes, then turn off the oven and leave the tray inside with the door cracked open for another 30 minutes. Transfer to the counter to cool completely.
Notes
Storage
Store these in an airtight container in the refrigerator for 2-4 weeks. Optionally, add about ½ cup of dry rice to the bottom of your storage container. Top with parchment paper or wax paper. Add sticks on top. This will help ensure the sticks stay as dry as possible. Mark the container with the batch date to help estimate the shelf life. I use freezer tape on the outside of the container.Freeze/thaw
Freeze in an airtight container for 2-3 months. Thaw in the refrigerator without opening the container until fully thawed. Texture Refrigerated Frozen- If your sticks are moist/soft – they’ll keep for 7–10 days in the fridge and up to 3 months in the freezer
- If your sticks are chewy – they’ll keep for 10–14 days in the fridge and up to 3 months in the freezer
- If your sticks are crisp/dry – they’ll keep for 1 month+ in the fridge and up to 4–6 months in the freezer
Spoilage Signs to Watch For
Mold White, green, black, or fuzzy spots. Often starts near the center or bottom of the container. If you see mold: toss the whole batch (not just the visible ones). Sour or Musty Smell Should smell like their ingredients (mild, nutty, or earthy). If they smell sour, fermented, cheesy, or “off,” they’re done. Texture Changes Crisp treats turning soft, sticky, or damp can indicate moisture exposure or bacterial activity. Chewy treats becoming harder may not be spoiled, but freshness is fading. Oil Separation or Discoloration If you see greasy streaks, dark spots, or separation, check smell and texture too. Condensation in the Container Moisture on the inside of the lid or walls means the environment’s too humid. Even if there’s no visible mold yet, it’s a sign they’re starting to turn. If you’re unsure, toss after about the 10th day. Note: This recipe was tested in a gas oven.


It gets the doggo seal of approval!

Any questions about the recipe?
If you have any questions before or after you make the recipe, drop them below.
Don’t forget to share your treats with us!
If you make this at home, we’d love to see! Tag us on Instagram @winstonbearofficial.